Friday, December 28, 2012

Best of 2012: Makeovers

Isn't it great to look back and see that you actually accomplished something? While I haven't done everything I planned to do in 2012, I am pretty happy to see that some progress was made.

Here are my favorite projects I have done in 2012:

Fireplace Makeover: I sanded the wood paneling, filled the grooves, and painted! If you haven't seen it yet, the tutorial on how to paint wood paneling is here.


Small Bathroom Makeover: I painted the walls and replaced the rod and shower curtain.


I also had the tile replaced. Click here if you would like to see more details.


Master Bedroom Makeover: I painted the walls, added nightstands, new lamps, and white bedding. I wrote about the transformation here.


Furniture Makeover: I transformed this ugly chest into a beautiful nightstand. For more photos click here.


What about you? Did you accomplish your goals in 2012? Do you have anything planned for 2013?


Link Up Parties:


Monday, December 17, 2012

Tutorial - How do You Fix a Hole in the Wall?

Our electric heat was replaced with gas heat years ago.... however this ugly control was left behind in the wall in every single room of our home. :(


Before painting my bedroom, I took the plastic box off  and of course, I ended up with a hole in the wall. :(

The good think is... repairing a hole in your drywall is not difficult! :-)


Here is what you need:

1. Steel Patch. I found these wall repair patches at Home Depot. They come in many different sizes and are very easy to use.
 
 
2. Patching compound


3. Putty knife and sandpaper.

 Here is what you need to do:

1. Clean up the area. - Remove any loose paint, dust, and/or particles around the hole. Sand the surface around the hole if you need to.


2. Place the steel patch on the wall. - This patch comes with some sort of glue already. All you need to do is remove the paper cover from the patch and place it over the hole. The steel should face the hole while the mesh should face outward. The mesh will stick to the wall. Easy peasy!


3. Apply compound over patch. - Wait for the compound to dry and sand! For a smoother appearance you can apply more compound, wait to dry, and sand again! I used 100 grit medium sandpaper.


4. Paint your wall. I used primer before painting!


Wall switch looks different because of lighting but this is the same wall! :o


So simple!  Now you know the easiest way to fix a small hole in your wall or ceiling in the blink of an eye! ;-)


Link Up Parties:

Thursday, December 13, 2012

$25 GIFT CARD WINNER

Thank you all for entering in our Target Gift Card Giveaway. It was very cool to read all your comments. I assigned a number for each one of you based on the order of your comments... Please click here if you would like to see your entry number. The drawing was powered by the True Random Number Generator (Random.org).

Sooooooo.... play the drums because the winner is...


 Congratulations Breanne (Entry #72)!


Please Breanne, leave a comment with your address (I won't publish your comment!). I will be sending your gift card shortly! ;-)

Tuesday, December 11, 2012

Decorating with Green

I want to start this post saying "thank you" to all of you who left nice comments on my previous post (From Ugly Chest to Pretty Nightstand). Wow... It was great to read all the comments! Because of YOU I am excited to do my next project! Thank you!

Talking about my next project... MY BEDROOM! As you have seen, my bedroom walls went from brown to pale gray (click here if you haven't seen it yet!). Now I have been looking for accessories... pictures, pillows, curtains, a rug... you know... all these good things! Sooooo.... yesterday I went to Tj Maxx (do you like this store?) and found a wall picture (which I like!) with several red tags on it (which I love!).  My idea is to go with blue and green for accessories... Who knows if I will change my mind or not... For now this picture is working well... :)


There are some scratches on the frame... but hey... what can you expect when you are paying only $18 for nice art work that comes with a certificate of authenticity? I will fix the scratches in a second! ;-)

Talking about green... You probably have heard Pantone picked green (emerald) as the color of the year for 2013.

Pantone

So be prepared to see this color all over the areas of design and fashion!

Pantone

Pantone
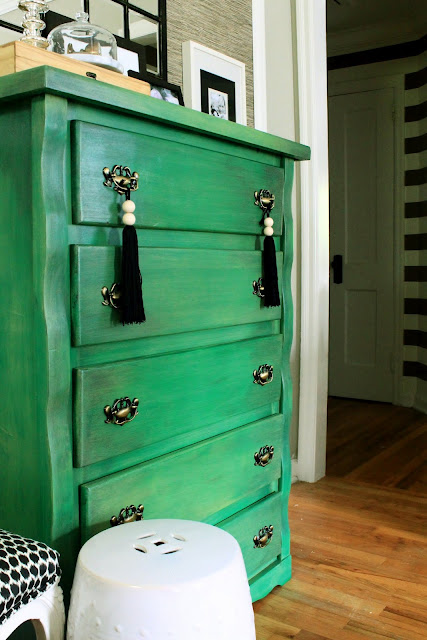
In reality I don't pay attention to whatever is "hot" or not in the fashion/design world.... But I like green... and blue.... Actually I was saving in my computer some beautiful inspirational pictures of rooms decorated with green. For instance, look this green chest! Love at first sight! ;-) I would love to have one like this...


The Hunted Interior


... and these green pillows! Just what you need to add a punch of color to a gray living room instantly!
 
CR 3
Charm Home
 ... or to a gray bedroom! Or any other neutral room! :)
CR 9
Charm Home
 
I think gray and green work together. Look this room... Well... I don't think I would do the green wall... maybe I am not brave enough!? ;-)
 
Laura Britt Design
 
What about you? Do you decorate with green? Feel free to share pictures of your green decor (links) if you would like to! ;-)


Thursday, December 6, 2012

Furniture Transformation - From ugly chest to pretty nightstand!

It took more days to finish this DIY project than I was expecting. The good thing is... I AM DONE! So... Here is my spray painted furniture...  Hope you enjoy the transformation as much as I do!

  AFTER:
 
 
BEFORE... So ugly! This poor thing...


How much did I pay for this? NOT MUCH: $20 for the chest (Craigslist), $11 for the round bun feet, $6 for the mount plates (feet), and around $20 for spray paint.  :-) I love a good deal!
 
 
Soon I will be sharing a few things (tips) that I learned from this project. But you know the best lesson? Love and patience can make the world prettier! ;-)
 
I hope you all have a great day!
 
 Link Up Parties:

TDC Before and After

Monday, December 3, 2012

Cleaning Furniture Hardware and Some Good News

Yesterday I did a little research and found out that you can actually clean your furniture hardware with vinegar. So I left my chest hardware immersed in vinegar last night. This morning I washed them using a sponge. Here you can see the contrast between the "dirty" one (top) and the clean one (bottom).


I am not sure if I will spray paint them or not but I think it is a good idea to clean them up anyway.

Talking about chest... It is almost ready! My DIY drama is over and I have a smile on my face again! :-)


More good news...  Kathryn Ferguson Griffin left me a message yesterday saying that my Moss Letter DIY project will be one of the features at Make it Pretty Monday at The Dedicated House. This is the first time I am featured and I am pretty happy about it! Thank you Kathryn! You made my day! ;-) If you have time, stop by her blog! She has many nice things going on over there!

 
That's all for today! Have a good day everyone!