Friday, January 25, 2013

Show Off Your Baskets!

I guess somebody else didn't see the value of three nice and large woven baskets. They were given away, and of course I grabbed them. They are just in perfect condition. Lucky me! My husband asked me if I was using them in the laundry. No way! There are so many ways to incorporate woven baskets into your décor other than having them in the closets or using them in the laundry!

We can use them next to the fireplace as wood holders.


Here is a great idea for a small entryway. Love the texture!
 
 
In the bathroom, baskets have been used for extra towels.
 
 
They can keep your blankets right at hand for a cold day.


They can keep the clutter away! ;-) One of my baskets looks exactly like this large basket next to this bed. Great find, right? 
 
 
What about you? Have you ever found anything for free that you really like? Any curb finds?
 
 
Have a great weekend, everyone! I will be back soon with my newest dresser update. 

Saturday, January 19, 2013

Bold Green Dresser - Refinishing Furniture With Paint And Stain

Hello friends! Hope you all are enjoying your weekend. Remember 
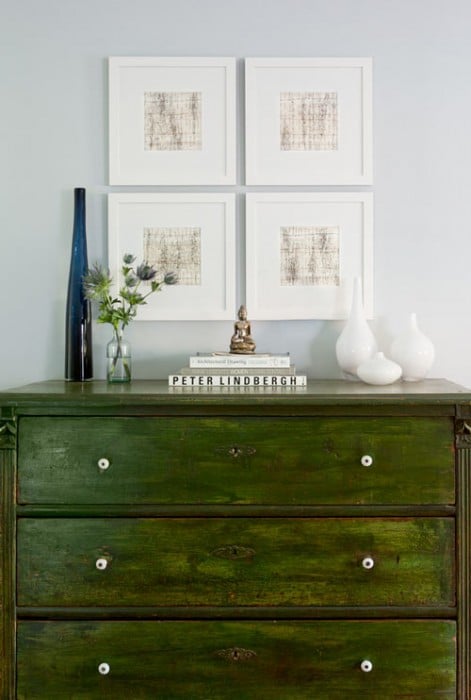
my dresser color dilemma? Oh well... I took the risk and painted the dresser green. I do love the final result especially after changing the original handles for glass knobs. They are so sweet!


Before...


 ... and after! :-)


For this project I used: Minwax Water Based Wood Stain (Early Spring Color and Green Tea Color - one can of each), Behr Paint 410D-4 Asparagus (one sample size was more than enough for the whole dresser), and Minwax Wood Finish (Golden Pecan 245).


Here is the step-by-step process:


Step 1 - Sand and wipe down the dresser
Step 2 - You should complete this step one small area at a time. For instance I did one drawer at a time, then I did the top, etc... Dip the brush in the Asparagus paint and then in the Green Tea Wood stain. Paint the chosen area. Then wipe the excess with a rag. (Important: always follow the grain direction when using the brush and when wiping the excess down). The dry-to-touch time will be less than five minutes. You will end up with something like this:


Step 3 - Using a brush, cover the area with Early Spring stain.

Then wipe the excess. You should always follow the grain direction. Wait to dry. Remember, stain dries quickly.

Step 4 - This is the tricky part. Using the same wet brush which you have been working with, get a little bit of paint (asparagus) and a little bit of Early Spring stain and dry paint the furniture (follow the grain direction!). If you get too much of each they will mix together and you won't have the same effect.

Step 5 - Distress the dresser (corners, etc...) using sandpaper. Sand these small areas until you see the wood.

Step 6 - After 24 hours cover your furniture with Minwax Wood Finish. Wipe the excess. Wait one or two days until your piece is completely dry. Caution: Use this product only with adequate ventilation! ;-)


Happy to have a "new" dresser and lots of storage!

... and guess what? Just found one more dresser on Craigslist for $20 (unbelievable, right?). I can't wait to refinish it.

See you soon! :-)

TDC Before and After

Monday, January 14, 2013

Seven Affordable Ideas for Wall Art

Two or three months ago I came to my kitchen and found this on the wall...


I asked my husband about it and he told me he hung the picture (which he found in a sports magazine) as a joke to see my reaction. I didn't react the way he was expecting. I told him the picture would be a good addition to the gallery wall in the office... and I was not joking! In fact I think that's how wall decor should be... it should tell a story, it should have some meaning, and (in my case) it should be affordable.
I have not always thought the same way. A few years ago when we bought our sofa, there was a large picture next to it. We bought the sofa and the picture because they both were "matching." Big mistake. Today I just don't like the picture at all. Eventually I will be replacing it with something more personal, more meaningful. There are so many nice (and affordable!) ideas out there. A few of them which I have been considering... 


1 - Ceramic Tiles
Do you know those leftover ceramic tiles? Group them together on the wall. You can even give them your personal touch by painting them. 


2 - Color Chips

Even when I am done picking a color for a room I never throw the color chips away. I have so many of them. I am thinking about gluing them together over an old framed canvas. 
 

3 - Maps

Are you going to a special place for vacation? Bring home the free map you usually find in the hotel, frame it, and hang it! What a great way to keep the memories alive!


4 - Fabric
You don't need to have a window to hang a beautiful fabric remnant. It may be the accent color your room is asking for! 
 

5 - Initial Letter

 What could be more personal than the first initial of your name?


6 - Metal Sculptures 

Sometimes wall sculptures can be lost on a large wall. Give them definition by painting a background behind them. 

7 - Word 

A single word can say a lot about you. Paint your favorite word on a blank canvas... 
... or form a word by hanging some letters together. 
Traditional Bedroom design by Denver Interior Designer Interior Design Concepts

Hope you enjoyed these ideas! ;-)

DRESSER UPDATE: Thank you for the suggestions about my dresser color. You guys are the best! ;-) I have been sanding the dresser for the last two days. Oh boy...  I didn't know it would be that much work. But... that's okay! I bought the paint today. It is going to be pretty! ;-)    

Linking up...

Thursday, January 10, 2013

Searching For The Perfect Dresser

I worked on my tall dresser today. :-) Wish I could share the after photo but I didn't finish my project yet. :-(

Do you want to see the before picture? The dresser came with a matching nightstand which I don't intend to use. I am planning to sell the nightstand back on Craigslist and have part of my "investment" back. ;-)


To be honest I was looking for a different style. However when I saw this dresser on Craigslist, I thought... "Well, I can make it work." Overall I am very pleased with it. The dresser is in perfect old condition:  sturdy, well built, and has a lot of storage.

Now I have a dilemma going on here... My plan was to paint my dresser green like this one in this photo...
1_stissingrd
Via Design Sponge

However I've been switching back and forth between adding a nice punch of color (green) to my bedroom or keeping the bedroom calm and relaxing. For instance, I do like the natural grayish brown on this Arhaus dresser. Maybe I will try to reproduce a similar look.


Belmont 5 Drawer Dresser
Arhaus
I will let you know the final decision. :-)
During my search  for inspiration I found this cool dresser which I though it would be worth sharing. Isn't it a piece of art? I wish I had the talent to do something like this... Love it!


Hopefully I can make up my mind about the color. Please, let me know if you have suggestions.

Enjoy your Friday! Weekend is on the way! :-)

Link Up Parties:

Wednesday, January 9, 2013

Black Notebook


Yesterday I went to Home Goods and found this nice black notebook. I will be using it daily this year for writing down quick notes, to-do lists, etc. I love the cover so much... it's just the perfect motivational message to start your day! :-)
 
Little update on my master bedroom... I finally found and brought home a nice old dresser which I have been looking for forever. This will be the last addition to my bedroom and then I will finally be done! I will be working on it today and tomorrow. You know... sanding, painting, having fun... Let's see how it will turn out!
 
See you soon! Have a great day everyone!


Friday, January 4, 2013

Tutorial: How To Install Bun Feet/Legs On Your Furniture

Not too long ago I refinished an old chest. If you haven't seen it yet the post is here. I had to replace the chest feet because they were in very bad condition. Fortunately, replacing them was not difficult at all. So I thought it would be a good idea to write a tutorial (for beginners!) on how to add bun feet/legs to your furniture.


BEFORE REPLACING THE FEET YOU WILL NEED:

  • Straight Top Plate (I bought mine at Lowe's) - one set for each foot. Each set comes with one plate and four mounting screws. There are other types of top plates. For instance, if you want to install angled furniture legs (midcentury style) go for "angle top plate."
  • Furniture feet/legs (I purchased these from Lowe's)
  • Drill

REMOVING THE FEET
 In my case, I just removed the screws and rotated the foot until it was completely off.


 INSTALLING THE METAL PLATE AND FEET:
Use the drill to make holes for the new screws.


Use the screws to attach the metal plate to the furniture.


 Screw the leg down through the threaded hole.

In my project, I ended up using this bun foot. No need to change the top plate. I just unscrewed the Hampton leg and screwed down the bun foot.

Here is the final result after the furniture was painted:


This was my first time installing furniture bun feet. Easy, easy project!

Link Up Parties:
Strut Your Stuff Saturday
Craft-O-Maniac Mondays
Market Yourself Monday
 The Sunday Showcase

Thursday, January 3, 2013

Ten Home Office Ideas


My master bedroom is almost done. YAY! Soon I will be sharing some pictures. I have to confess that while I have fun doing it, sometimes I fear the final result... "What if this is not the right thing?" During these times I have to remind myself that there is no right or wrong when you are decorating your own home. Do what you like and everything will be fine! :-) Do you agree?

Anyway, as soon as I am done with my bedroom I will start my home office. I have gathered some really nice home office pictures in my inspiration file.  From these pictures I have found ten ideas to decorate a home office. Here they are...

 Idea # 1: GALLERY WALL
Do you know those wall pictures that you already have but have no place for them?  Well... I have a few of them too. Grouping them on the wall can give your office so much personality.
Idea #2: WINDOW TREATMENTS
Go for short panels if you plan to use your desk (or daybed, small shelves, seating area, etc...) under your window.
My desk will be under the window so short panels will work perfectly!
Idea #3: WALL ORGANIZERS
Wall organizers for papers and pens are great for home offices, especially when you have a small space like mine. ;-)
  
Idea # 4: COLOR SCHEME 
I will be sharing the office with my husband... So I am looking for a husband-and-wife-friendly color palette... not so girly, not so masculine... For instance, I like the color scheme in this picture: gray, white, black, and orange. Yes, I like orange... Have you noticed my blog header? :-)
 Idea #5: FLOATING SHELVES
They save space and are great for displaying your favorite objects.
Idea # 6: FLOOR BASKETS
Do you know those "homeless" items? We need them but we have no place for them! Grouping these items in baskets is a great way to organize them and incorporate them into your decor! ;-)
Idea #7: BULLETIN BOARD
Show off your DIY talent! Build a bulletin board with an old frame and burlap.
Idea #8: WALLPAPER
Covering just one wall with wallpaper is a great way to add drama to your office. Don't like the wallpaper idea? You can paint the wall to get the same wallpaper look.
 Idea #9: STORAGE CUBE SHELVES
Do you need more workspace storage? Why not cube shelves? I am a big fan of them. 
 
Home Office design by Other Metro 2.bp.blogspot.com
Via Houzz

 Idea #10: DAYBED
I do have a twin bed in my office. I am thinking seriously about building a daybed with baskets like this one in the photo... a great idea for creating more storage! ;-)

That's all for now! Hope you enjoyed all these home office ideas! ;-)

Link Up Parties: