Showing posts with label Furniture. Show all posts

Wednesday, May 8, 2013

Dresser Transformation - Painting Furniture with Annie Sloan Chalk Paint

Hi all! Remember my chest of drawers from Craigslist?  Well... it's all done! I thought it would be a great project to finally try out Annie Sloan chalk paint. No sanding, no priming... What's not to like?


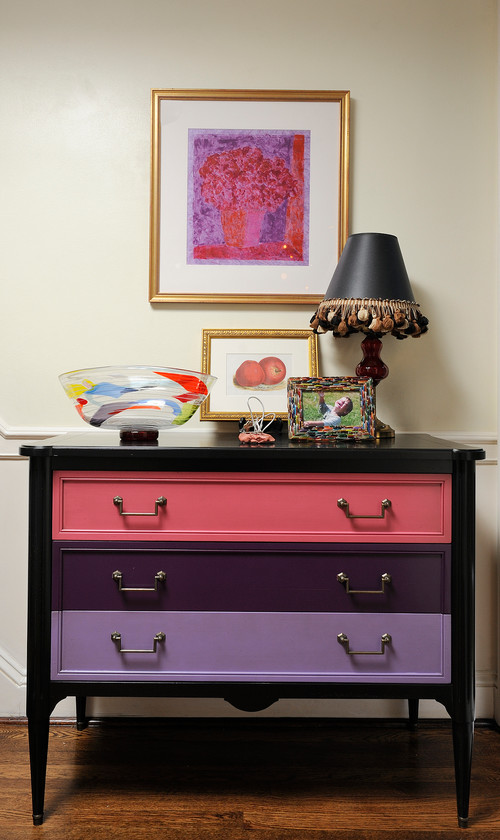
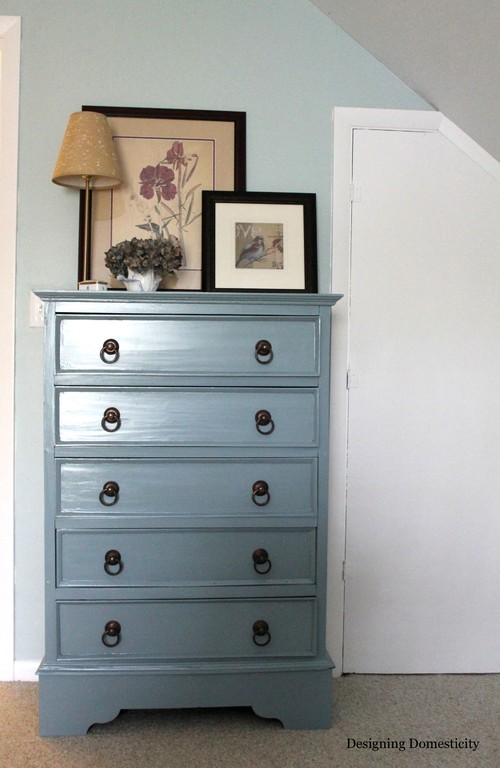
Greek blue was my color of choice and I loved it!


I re-toned the previously stained top with Minwax Wood Finish (Jacobean 2750). That gave a darker, richer color to the top.


Here is how I did my dresser transformation:

1 - After removing the hardware, I wiped the dresser with sander deglosser (Home Depot). You want to clean the surface well and this product does a great job.


2 - I used a regular brush to paint the dresser. Here is how it looked like after the first coat:


3 - After the dresser was dry to the touch (it doesn't take long), I applied the second and final paint coat:


4 - When the paint was dry I used a rag (old T-shirt) to apply clear Annie Sloan soft wax to the surface. The wax will feel dry after you have applied it. If not, you have used too much wax. In this case, just wipe down the surface again. I applied clear wax twice just to make sure the dresser was evenly protected.

5 - To be honest I was afraid to use dark wax over my dresser. I waited one more day to think about it and I am glad I took the risk. The dark wax gave a depth of richness to the dresser. I applied the dark wax the same way I did with the clear one (with a rag). If you feel you have applied too much dark wax just wipe the surface again with clear wax to take the excess.

When applying wax, you have to use your muscles to push it into the paint. :-)

6 - I waited 24 hours to buff the dresser. It seems like you can achieve a better shine if you wait that long.

Here are the before and after pictures:


This was a fun project!

What about you? Have you tried chalk paint before?

What I don't know yet is how this paint will hold up to wear and tear over time. Hopefully everything will be fine... Let's wait and see. :-)


Linking up
Under $100 | Think Tank Thursday | Transformation Thursday | Catch as Catch Can | Be Inspired | Feathered Nest Friday | Pity Party | Show and Tell Friday | Furniture Feature Friday | Frugal Friday | Strut Your Stuff | Spotlight Saturday | Show and Tell Saturday | Market Yourself Monday | Motivate Me Monday | The Sunday Showcase | Craft-O-Maniac Monday | Nifty Thrifty Tuesday | Trash 2 Treasure | Swing into Spring | Thrifty Decor Chick | Anything Blue Friday

Thursday, April 25, 2013

What should I do with this? - Ideas to refinish a dresser

Hey everybody! I am so excited to share with you my "new" dresser. Well, it's new for me! I found this beautiful thing on Craigslist for only $20. What? $20 for a solid wood dresser? Yes! I couldn't resist and got it! ;-) Better yet, I had to drive only five minutes away from home to get it.


Of course I have been all over the internet searching for inspiration. There are so many beautiful dressers. 
 
Anyway, here are my ideas for my new dresser:
 
1. Maybe I should go with two colors. This chest is gorgeous... 


2. What about a distressed white washed dresser?


3. Maybe I should leave the dresser alone as is? No work but no fun either.


4. Maybe I should go with just one solid color? I like this little cute chest...
 

 5. Another possibility is to stain the top of the dresser instead of painting everything.
 
 
6. Maybe the world should be more colorful! :-)
 

7. I like the idea to paint the dresser the same color as the wall...
 
 
8. What about this dresser? Beautifully glossy...
 
 
My mind is spinning with so many choices!
 
What about you? Has anyone found any good treasures on Craigslist recently?
 
Hope you all have a great Friday! 
 
Thanks for stopping by.
 
:-)


Linking up...


Saturday, January 19, 2013

Bold Green Dresser - Refinishing Furniture With Paint And Stain

Hello friends! Hope you all are enjoying your weekend. Remember my dresser color dilemma? Oh well... I took the risk and painted the dresser green. I do love the final result especially after changing the original handles for glass knobs. They are so sweet!


Before...


 ... and after! :-)


For this project I used: Minwax Water Based Wood Stain (Early Spring Color and Green Tea Color - one can of each), Behr Paint 410D-4 Asparagus (one sample size was more than enough for the whole dresser), and Minwax Wood Finish (Golden Pecan 245).


Here is the step-by-step process:


Step 1 - Sand and wipe down the dresser
Step 2 - You should complete this step one small area at a time. For instance I did one drawer at a time, then I did the top, etc... Dip the brush in the Asparagus paint and then in the Green Tea Wood stain. Paint the chosen area. Then wipe the excess with a rag. (Important: always follow the grain direction when using the brush and when wiping the excess down). The dry-to-touch time will be less than five minutes. You will end up with something like this:


Step 3 - Using a brush, cover the area with Early Spring stain.

Then wipe the excess. You should always follow the grain direction. Wait to dry. Remember, stain dries quickly.

Step 4 - This is the tricky part. Using the same wet brush which you have been working with, get a little bit of paint (asparagus) and a little bit of Early Spring stain and dry paint the furniture (follow the grain direction!). If you get too much of each they will mix together and you won't have the same effect.

Step 5 - Distress the dresser (corners, etc...) using sandpaper. Sand these small areas until you see the wood.

Step 6 - After 24 hours cover your furniture with Minwax Wood Finish. Wipe the excess. Wait one or two days until your piece is completely dry. Caution: Use this product only with adequate ventilation! ;-)


Happy to have a "new" dresser and lots of storage!

... and guess what? Just found one more dresser on Craigslist for $20 (unbelievable, right?). I can't wait to refinish it.

See you soon! :-)

TDC Before and After

Friday, January 4, 2013

Tutorial: How To Install Bun Feet/Legs On Your Furniture

Not too long ago I refinished an old chest. If you haven't seen it yet the post is here. I had to replace the chest feet because they were in very bad condition. Fortunately, replacing them was not difficult at all. So I thought it would be a good idea to write a tutorial (for beginners!) on how to add bun feet/legs to your furniture.


BEFORE REPLACING THE FEET YOU WILL NEED:

  • Straight Top Plate (I bought mine at Lowe's) - one set for each foot. Each set comes with one plate and four mounting screws. There are other types of top plates. For instance, if you want to install angled furniture legs (midcentury style) go for "angle top plate."
  • Furniture feet/legs (I purchased these from Lowe's)
  • Drill

REMOVING THE FEET
 In my case, I just removed the screws and rotated the foot until it was completely off.


 INSTALLING THE METAL PLATE AND FEET:
Use the drill to make holes for the new screws.


Use the screws to attach the metal plate to the furniture.


 Screw the leg down through the threaded hole.

In my project, I ended up using this bun foot. No need to change the top plate. I just unscrewed the Hampton leg and screwed down the bun foot.

Here is the final result after the furniture was painted:


This was my first time installing furniture bun feet. Easy, easy project!

Link Up Parties:
Strut Your Stuff Saturday
Craft-O-Maniac Mondays
Market Yourself Monday
 The Sunday Showcase

Thursday, December 6, 2012

Furniture Transformation - From ugly chest to pretty nightstand!

It took more days to finish this DIY project than I was expecting. The good thing is... I AM DONE! So... Here is my spray painted furniture...  Hope you enjoy the transformation as much as I do!

  AFTER:
 
 
BEFORE... So ugly! This poor thing...


How much did I pay for this? NOT MUCH: $20 for the chest (Craigslist), $11 for the round bun feet, $6 for the mount plates (feet), and around $20 for spray paint.  :-) I love a good deal!
 
 
Soon I will be sharing a few things (tips) that I learned from this project. But you know the best lesson? Love and patience can make the world prettier! ;-)
 
I hope you all have a great day!
 
 Link Up Parties:

TDC Before and After